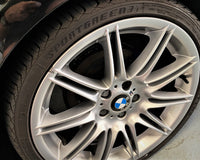

Wheels and calipers are often the most neglected parts of a car when it comes to detailing. While most car owners pay great attention to the paintwork and interiors, the wheels bear the brunt of daily driving. Road grime, brake dust, tar, and contaminants quickly build up, not only dulling the visual appeal of your vehicle but potentially damaging wheel finishes and caliper surfaces over time. Properly detailed wheels and calipers can dramatically elevate the overall look of your car, giving it that refined, showroom-ready appearance that enthusiasts strive for.
Detailing these components isn’t just about aesthetics. Brake dust is highly corrosive, and if left untreated, it can cause long-term damage to alloys and painted or anodised brake callipers. A dedicated cleaning and protection process ensures longevity, performance, and an eye-catching finish.
Preparing for Wheel and Caliper Detailing
Before diving into the detailing process, preparation is key. Choose a well-ventilated space away from direct sunlight. Make sure your car is parked securely with the engine off and handbrake engaged. Allow the wheels to cool completely, especially after a drive, as working on hot wheels or calipers may reduce the effectiveness of your cleaning efforts and even risk injury.
While you don't necessarily need to remove the wheels for a good detail, removing them can offer much better access to the inner barrel and the full surface of the calipers. For a full professional result, wheel removal is strongly recommended if you're confident and have the proper equipment.
Tools and Materials You'll Need
To detail your wheels and calipers effectively, gather the following tools and materials:
-
Wheel cleaner suitable for your wheel type (e.g., alloy, chrome, painted, matte)
-
Soft and stiff-bristle wheel brushes in varying sizes
-
Detailing brushes (angled or small for lug nuts and calipers)
-
Buckets (preferably one for wheels only)
-
Microfibre towels
-
Hose with strong water pressure or pressure washer
-
Caliper cleaner or degreaser (if applicable)
-
Iron fallout remover (for deep decontamination)
-
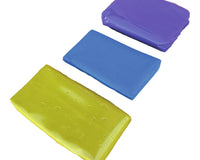
Clay bar (optional but useful for stubborn contamination)
-
Sealant or wheel wax for protection
Cleaning the Wheels Thoroughly
Step 1: Rinse Away Loose Debris
Begin by thoroughly rinsing each wheel to remove as much loose dirt and brake dust as possible. This pre-rinse will prevent excessive scratching during brushing and ensure your cleaner performs better.
Step 2: Apply Wheel Cleaner Generously
Spray a generous amount of wheel cleaner, covering the face, barrel, lug nuts, and behind the spokes. Allow the cleaner to dwell for the manufacturer-recommended time. Be cautious with acid-based cleaners on delicate finishes.
Step 3: Agitate with Brushes
Use a dedicated wheel brush to scrub the barrel and spokes. Reach in behind the spokes to remove grime from hidden areas. For tight areas such as lug nuts, use smaller detailing brushes. Work methodically, ensuring every section is agitated.
Step 4: Clean Tyres Too
Tyres often collect old tyre dressing, dirt, and road oils. Use a stiff tyre brush and all-purpose cleaner to scrub them clean. Clean tyres not only look better but help new dressings adhere properly.
Step 5: Rinse Thoroughly
Once the agitation is complete, rinse the wheel thoroughly. Use high-pressure water to ensure all cleaner residue and dislodged grime are removed.

Cleaning the Brake Calipers
Step 1: Spray on a Degreaser or Caliper Cleaner
Brake calipers attract a significant amount of brake dust and grime. Use a degreaser or a specific caliper cleaner and apply it liberally over the surface. Let it dwell for a few minutes.
Step 2: Scrub with Small Brushes
Use soft, narrow detailing brushes to get into all the contours and crevices. If your calipers are painted or powder-coated, ensure the brushes aren’t too abrasive.
Step 3: Use Iron Fallout Remover (Optional)
If your calipers haven’t been cleaned in a long while, an iron fallout remover can help remove embedded ferrous particles. Spray it on and let it react (you'll notice a purple bleed effect). Follow this with a rinse.
Step 4: Rinse and Dry
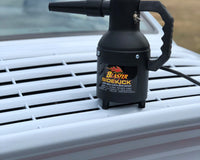
Rinse the calipers carefully using a hose or spray bottle. Avoid soaking any electrical components or sensitive parts. Dry them using a clean microfibre towel or air blower for best results.
Decontaminating for a Smooth Finish
For wheels that haven’t been cleaned in a long time or that feel rough to the touch, using a clay bar can lift bonded contaminants that standard cleaners leave behind. Lubricate the wheel surface with clay lube and gently rub the clay bar across the surface. This step is particularly useful before applying any sealant or wax for optimal adhesion.
Polishing and Restoring Shine (Optional)
If your wheels have a clear-coated or painted finish and appear dull or slightly scratched, a gentle polish can restore the shine. Use a light polishing compound and a foam applicator pad or microfibre cloth. Work in small sections and buff off any residue. Avoid polishing matte or anodised finishes.
Protecting Wheels and Calipers for the Long-Term
Protection is the key to prolonging the cleanliness and shine of your wheels and calipers. Applying a dedicated wheel wax or ceramic-based sealant creates a hydrophobic layer that repels water, brake dust, and grime.
Apply the sealant using a foam applicator, let it cure as per instructions, and buff with a microfibre towel. For calipers, use a high-temperature-resistant sealant if available. Protection makes future cleaning much easier and preserves the aesthetic value.
Reinstalling Wheels and Final Touches
If you removed the wheels, reinstall them carefully and torque the nuts to manufacturer specifications. Once everything is back in place, give the wheels a final wipe to remove fingerprints or missed spots.
You may also want to apply tyre dressing to finish off the look. Opt for a non-greasy, satin finish dressing that won't sling onto your freshly cleaned wheels.
Maintenance Tips for Keeping the Finish Pristine
-
Clean your wheels and calipers at least every two weeks to prevent excessive buildup
-
Avoid automatic car washes that use harsh chemicals or brushes
-
Reapply protective sealants every few months, depending on driving conditions
-
Consider investing in a set of soft wheel brushes and dedicated products for consistent care
Final Thoughts
Detailing your wheels and brake calipers doesn’t just enhance the visual appeal of your vehicle—it protects one of the most exposed and abused parts of your car. By adopting a proper cleaning and protection routine, you can maintain that professional finish and ensure your car stands out on the road. Whether you're preparing for a car show or just want your daily driver looking its best, don’t overlook these critical areas. Give them the attention they deserve, and the results will speak for themselves.